June 25 2026: Upcoming navigation changes
June 25 2026
Navigation quick reference guide: Where has it moved?
Want to know more about the upcoming changes to our navigation menu? We have all the details.
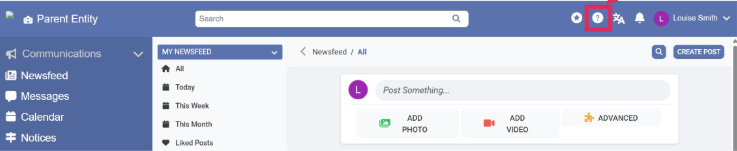
Feature icons
Anything that was previously accessed from the feature icons across the top of the screen has now moved into the left menu.

Depending on the view being used, these areas will appear in different places.
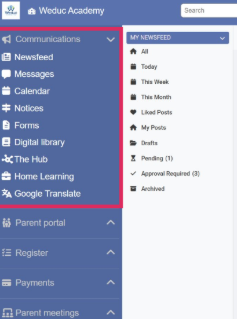
School view
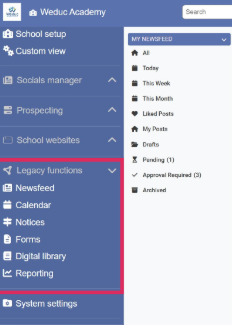
MAT view
For most school users, these options will appear near the top of the left menu under Communications. For users with MAT view, such as Trust central teams, these options will appear further down the left menu under Legacy functions.
Some features, such as Parent Meetings and Payments, now have their own section in the left menu. Some areas that were previously accessed through the top right system settings menu have also moved into their own section, including Absence Reporting, Registers and Reports.
System settings
Previously, settings were accessed from the school settings option in the top right menu.

This opened a separate settings page.

The settings page included a scrollable menu on the left side.
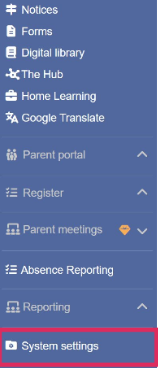
System Settings can now be found at the bottom of the left menu.
System Settings tab
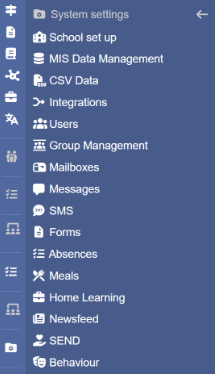
Submenu
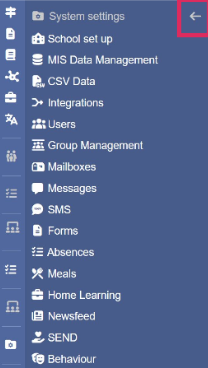
Back arrow
Selecting System Settings opens a submenu. From here, settings can be accessed for each area of the product. To close the submenu and return to the main menu, select the left pointing arrow at the top.
See the table below for a quick reference guide on where specific features are now located.
| Looking for... | Find it here... |
|---|---|
| Absence Reporting | Absence Reporting (own section in left menu) |
| Academic Year Configuration | System Settings > School Setup |
| Additional User Options | System Settings > Users |
| Analytics | System Settings > Integrations |
| Appearance Settings | System Settings > School Setup |
| Assign Roles to Users | System Settings > Users |
| Audit Logs | Reporting (own section in left menu) |
| Balance Adjustments | System Settings > Meals |
| Calendar | Communications > Calendar |
| CSV Upload Structure | System Settings > CSV Data |
| Parent Meetings Settings | Parent Meetings > Custom Settings |
| Data Change Requests | System Settings > Users |
| Event Types & Resources | System Settings > School Setup |
| Forms | Communications > Forms |
| Form Settings | System Settings > Forms |
| Group Management | System Settings > Users |
| Help | Help button (question mark icon in the top right of the screen) |
| Home Learning | Home Learning (own section in left menu) |
| Homework Settings | System Settings > Home Learning |
| Integrations | System Settings > Integrations |
| Mailboxes | System Settings > Messages |
| Manage Deleted Users | System Settings > Users |
| Manage Events | Parent Meetings > Manage Events |
| Message Settings | System Settings > Messages |
| Message Templates | System Settings > Messages |
| Messages | Communications > Messages |
| MIS Configuration | System Settings > MIS Data Management |
| MIS Sync Tasks | System Settings > MIS Data Management |
| MIS Task History | System Settings > MIS Data Management |
| My Events | Parent Meetings > My Events |
| Newsfeed | Communications > Newsfeed |
| Newsfeed Management | System Settings > Newsfeed |
| Notices | Communications > Notices |
| Product Updates | Product updates button (star icon in the top right of the screen) |
| Reports | Reporting (own section in left menu) |
| Registers | Registers (own section in left menu) |
June 25 2026: Upcoming changes to changing branding
June 25 2026
Coming soon: Branding update and how to change your portal colours
As part of our upcoming navigation improvements, we are simplifying the branding options available within the portal.
To improve accessibility and create a more consistent experience across the platform, schools will be able to choose from approved primary and secondary colour combinations. Existing branding options will be reduced, and the portal banner image option will be removed.
The parental experience in the app will be unchanged. Any customised app will still show the chosen school branded colours. The changes only affect the portal which is staff-facing.
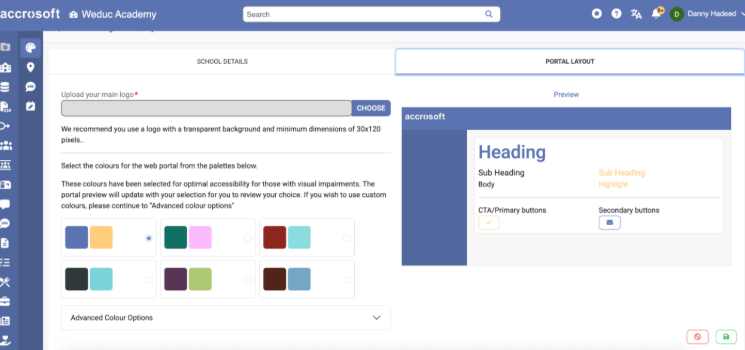
Bespoke colour options are still available. If you wish to use bespoke branded colours, click the dropdown box titled “Advanced colour options.”

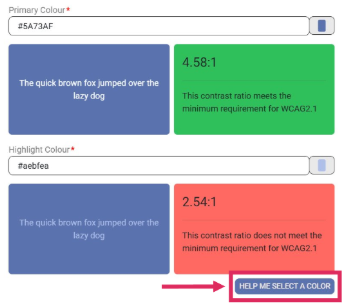
This brings up information about how to add your hex codes and meet accessibility requirements.
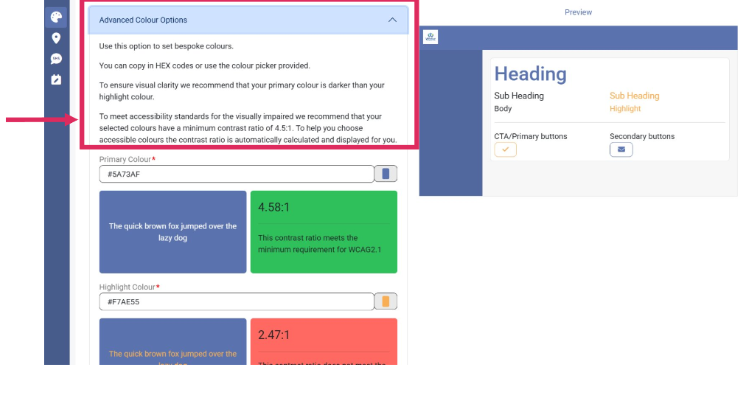
There is even a handy button which will help you select appropriate colours if your current choices do not meet accessibility requirements.
These changes help ensure the portal remains clear, accessible and consistent for all users, while helping to standardise the platform and simplify ongoing development, maintenance and support.
This is a visual change only and will not affect how any features or functionality work.
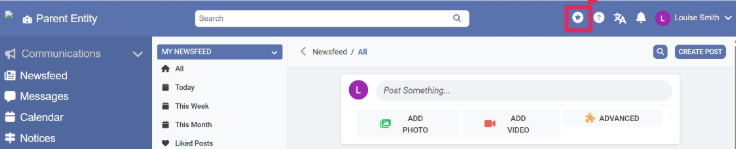
June 25 2026: New help and product update shortcuts
June 25 2026
New help and product update shortcuts
As part of the navigation update, you will notice a few new icons within the portal designed to make it easier to access help, discover available features and understand what is included in your Reach More Parents package.
 Help button
You'll now find a dedicated Help button within the portal.
Selecting this button gives you quick access to support resources by opening our Knowledge Base in a new tab. This allows you to search articles and videos, helping you find answers quickly.
This change makes support more visible and easier to access, helping staff get the assistance they need exactly when they need it.
 Product News page
A new Products News button has been added to the navigation.
This provides a central place to view any updates to the product, such as new feature releases, bug fixes and tips and tricks to get the most from the platform. Rather than just relying on email updates, the latest product information can now be accessed from a single, consistent location.
The aim is to make it easier for users to see updates and information, helping them to get the best from the platform.
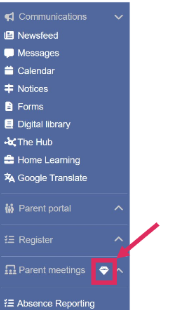
 Gem icons
If you see a gem icon alongside a feature, this means the functionality is available within Reach More Parents, but it is not currently included in your organisation's subscription.
The feature is visible so that users can see the wider capabilities available within the platform and become aware of additional tools that may benefit their school or trust. Gem icons are only visible to staff members.
To gain access to a feature marked with a gem icon, your organisation would need to upgrade its Reach More Parents subscription.
If you would like to find out more about a feature displaying a gem icon, please contact the Reach More Parents team.
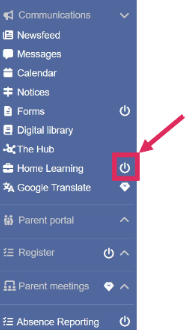
 Disabled icons
If a feature appears with a disabled icon, this means the feature is included within your organisation's package, but your user role does not currently have permission to access it.
This is different from a gem icon. The functionality is already available to your organisation, but access has been restricted through role permissions. Only staff members can see disabled icons.
If you believe you need access to a feature that is displayed as disabled, please contact your school's System Administrator. They can review and update your permissions if appropriate.
Why are these icons being introduced?
These icons are designed to provide greater transparency and reduce confusion about feature availability.
They help you quickly understand:
-
Which features are included in your organisation's package
-
Which features are available as part of an upgrade
-
Which features are restricted by role permissions
By making this information visible within the portal, users can more easily discover functionality, understand access restrictions and find the right route to request additional access or services.